ESP Websites Design Studio Advanced Design: Manage Pages
In this quick step guide you will learn how to edit and create new pages in your ESPWebsite.
-

To edit the pages of your site and their information, hover on Advanced Design in the Design Studio menu and then click on Manage Pages.

The Manage Pages area enables you to add pages, as well as edit the features and properties.
-

What's Covered:
-
Manage Pages Tab
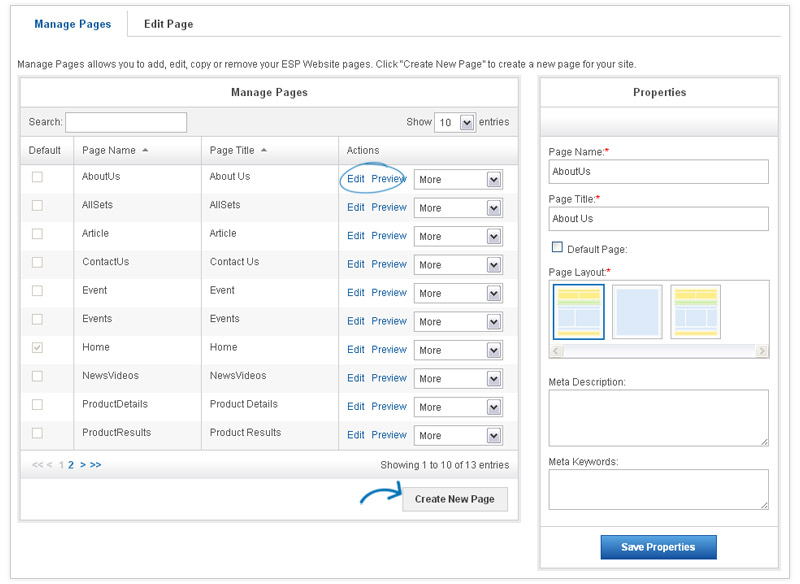
In the Manage Pages tab, you will see a list of all the pages available on your site. From here you are able to Edit and Preview, as well as delete, or copy your pages.
To create a new page, click on the Create New Page button at the bottom of the Manage Pages area.

Create New Page
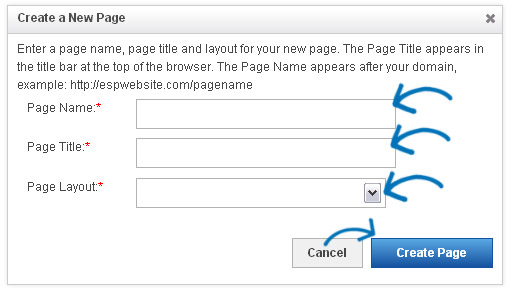
You will need to enter a Page Name, Page Title, and Page Layout. When you finished entering this information, click on the Create Page button.

Pages Required Fields
A Page Name is the extension for this page from the site's URL. For example: abcpromos.espwebsite.com/AboutUs.
The Page Title is the text that appears in the browser bar. For example:

The Page Layout refers to how many columns you're site will have. Generic2Column is the most standard, and recommended option. However, if you want your site to have 3 columns, select Generic3Column layout instead.
-

-
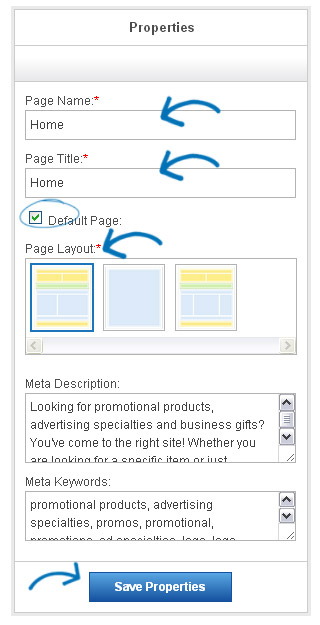
When you click on the Edit link in the Manage Pages area, the properties of that page will open in the Properties area.

You can check the Default Page box to make this your default page. Your default page is what displays when your site is accessed, or your 'Home' page.
There are Page Layouts available. You can see a preview of each layout. Click on it to select it.
The Meta Description and Meta Keywords boxes are where you can enter individual meta tags for this page.
- Generally, meta tags consist of three fields: title, description, and keywords. The title and description of your site will be displayed on a search engine's results page. They need to be coherent and concise.
- Keywords, on the other hand, will not be seen and are only for the search engine's background ranking processes. In this section, you can enter multiple keywords separated by commas. For example: promo products, imprinted products, promo items, imprinted items, etc.
When you are finished customizing the properties of your page, click on the Save Properties button.
-

-
Edit Pages
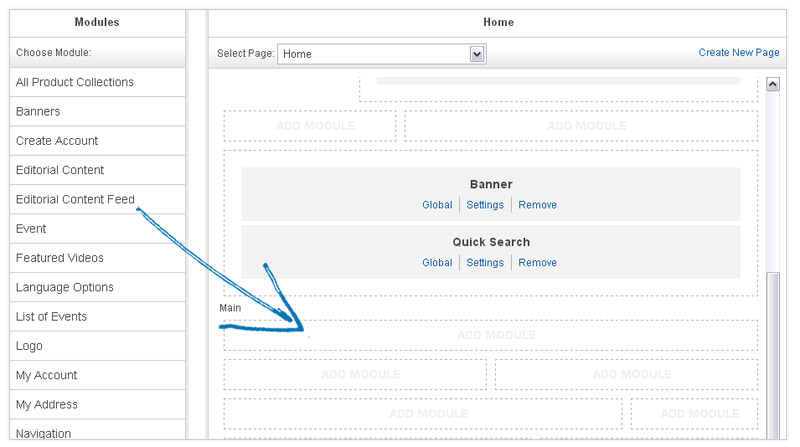
The Edit Page section displays your page in terms of modules and zones. Essentially, the feature you would like to have on your page is a module (Select-A-Search, Product Collectin, Text, etc.) that you place inside of a zone area.
The zones are broken down into sections:
- Header
- Main
- Footer
The first step is to use the Select Page dropdown menu to select the page you would like to edit. You can drag a module to a zone and then configure it.

For example, if we wanted to add Editorial Content to our Homepage, we could do so by dragging the Module on the left and dropping it into the zone of the page. Click here to see a demo.
Then, after dragging and dropping the module into the zone, you will need to configure that module. The configuration options will vary depending on the module's capabilities. Click on Save to finish adding the module.

Module Settings
Every Module will have three links associated to it after you've configured the settings. Global, Settings, and Remove.
The Global link will tell the site to keep that module, where you've placed it, on every page in the site. Global elements are typically placed in the header and the footer of the site.
Multple Modules Per Zone
More than one module can be added to a zone and modules can be dragged and dropped from one zone to another. There is no save button in this area. All changes are automatically saved.
To make these changes live, click on the Publish link in the Site Toolbar.
